Have you ever forgotten to add a file or folder to Time Machine’s “Do Not Back Up” list and wondered how to get rid of the backups of that file/folder which have already been made?
Every once in a while you may decide that you no longer want certain data on your Time Machine drive, perhaps for free space concerns. To prevent future backups you would open Time Machine Preferences, click the Options button, and select the files or folders you want to exclude. But what about all those copies you’ve accumulated with Time Machine already? Apple doesn’t make it the most obvious thing to figure out, but the functionality is there if you know where to find it.

Delete files from Time Machine backups
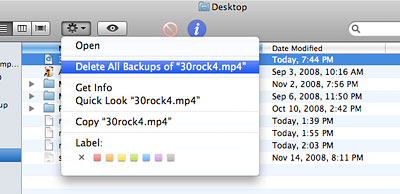
Launch Time Machine and navigate through the Finder window to the location of the soon-to-be-exiled files or folders. Highlight your selection and click the Action button in the toolbar. Choose the “Delete all backups of…” option and you’re good to go! It may ask for your user account password, but that’s all there is to it. Time Machine will remove any traces of that data, but won’t touch the original copies that are on your main hard drive.

Browse other Time Machine volumes
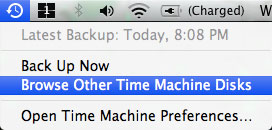
As an added bonus for you aspiring Time Machine geeks who are reading this, here’s another somewhat hidden but good to know tip… If you connect another Mac’s TM drive or use your TM drive to back up multiple Macs, you can conveniently browse the backups of those machines. Click the Time Machine menu bar icon and hold down the Alt/Option key on your keyboard — notice how “Browse Other Time Machine Disks” appears as an option. If you don’t have your menu bar icon enabled, you could also Control+Click on the Time Machine icon in your Dock.


