At some point, unless you are an extremely light computer user, most people will outgrow their Time Machine disk and need to migrate to a bigger one. Here’s how to do it without losing your backup history.
As a Time Machine disk drive gets full, the program will automatically delete your older backups to make room for new ones. Some folks won’t care depending on how long ago those backups were made, but others feel compelled to have a permanent snapshot of their systems from any given time always available. The only way to handle this particular situation is to get a larger hard drive to replace your current TM volume. Unfortunately, a new drive means starting fresh with a clean slate and no backup history.
Not so fast — there is a simple and free way to make an exact copy (or “clone”) of your current Time Machine disk and plop it on your new roomier drive. You’ll never notice the difference, with the exception of having all that free space. Here’s how you do it:
1.) Connect both your current TM drive and the one you plan to use in the future to your Mac.
2.) Turn off Time Machine to avoid having new backups made during the cloning process. Make your way into System Preferences and slide the big switch into the Off position, as shown below.

Turn off Time Machine
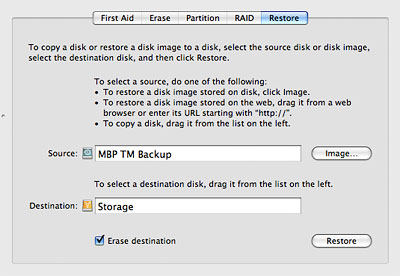
3.) Launch Disk Utility (Applications > Utilities). In the left pane you should see both of your disks on the list. Click on one of them and select the Restore tab towards the top of the window.
4.) Drag your current Time Machine volume (shown with a green disk icon on the left pane) to the Source field. Then drag your new Time Machine volume to the Destination field. Ensure you have no important data on the Destination drive because it will be erased permanently.

Clone your Time Machine drive using Disk Utility
5.) Check the “Erase destination” box and click the Restore button. Cloning the data block-by-block may take quite a bit of time, so expect a fairly long wait.
6.) Once the data has been copied, it’s usually a good idea to rename the old TM volume so it doesn’t conflict with the new one. Right-clicking on its name in Finder and choosing “Rename…” is all there is to that.
7.) Finally, go back into System Preferences and switch Time Machine’s slider back into the On position. Everything should pick up right where it left off, except with more room to breathe on that new disk drive.


February 25th, 2009, 1:36 AM
Solucien,
It sounds like your problem is due to the new hard drive not being formatted correctly. Out of the box, most external drives are in a format both Windows PCs and Macs can understand. Time Machine requires the Mac-only HFS+ file system to function. Take a look at one of our Time Machine troubleshooting articles for the solution to this issue: http://www.macyourself.com/2008/10/14/handy-guide-for-time-machine-tricks-and-troubleshooting-tips/