Subscribe to MacYourself via RSSFollow MacYourself on Twitter

How to show hidden files on a Mac with the help of Automator

How to show hidden files on a Mac with the help of Automator

Unlike Windows, the Mac operating system does not make it easy to view the hidden files on your computer. Apple does this for our own safety since messing with hidden files can get ugly, but in certain cases it still needs to be done.

Although just about anybody could need to at some point, web developers are probably the most common group of people who work with hidden files on a regular basis. For example, the other day I needed to edit a .htaccess file on my server and couldn’t find where it went after downloading it to my desktop. I knew it was there, but since the filename starts with a dot (“.”) Mac OS X is set to hide it by default. Generally this behavior is a good thing, but not in this particular instance.

Running a command in Terminal is the most basic way to show hidden files on a Mac. While that method works fine, it sure is a pain to remember the code every time you want to toggle it on or off. Instead, we’re going to utilize the power of Automator (which is built into Mac OS X) to create a Finder plug-in that can be easily accessed at any time. Please note this method does not work in 10.6 Snow Leopard.

  1. Coincidentally, the first step is to launch Automator from the Applications folder. If you’ve never used this program before, don’t worry. It’s extremely confusing to newcomers (myself included), but our task for this tutorial is very simple.
  2. On the left side you should see a list of Actions in the library. Choose Utilities and then double-click Run Shell Script in the next column (or drag it to the workflow area).
  3. Type the following code into the text box. I wouldn’t recommend copying and pasting directly because the apostrophes & quotes have a tendency to get screwed up.

    defaults write com.apple.finder AppleShowAllFiles TRUE
    osascript -e ‘tell application “Finder” to quit’;
    osascript -e ‘tell application “Finder” to activate’;
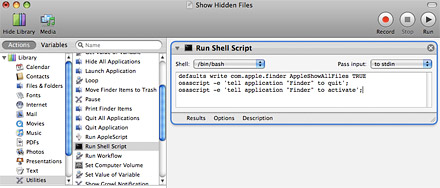
    Show hidden files on Mac
  4. In the menu bar, go to File > Save As Plug-In. Type in a name like “Show Hidden Files” and click the Save button.
  5. Since it’s not a good idea to leave hidden files turned on all the time, we also need to create a plug-in which brings things back to normal. Keeping the same command as before, simply change TRUE to FALSE in the workflow and go to File > Save As Plug-In again. This time name it “Hide Hidden Files” and click Save.

Our work in Automator is complete and now it’s time to enjoy the fruits of our labor — all 3 minutes of it. Right-click anywhere on your desktop or in a Finder window. In the popup menu that displays, go to More > Automator > Show Hidden Files. There they are! All your hidden files should now be visible. When you no longer have a need to see them, right-click again and this time choose Hide Hidden Files from the menu.

Show hidden files on Mac

Oh, and there is one last thing… (sorry, I had to say it). It’s easy to remove these plug-ins from your system by going to Users/[username]/Library/Workflows/Applications/Finder and dragging the two files to the Trash.

27 Comments Have Been Posted (Leave Your Response)

Nice hint, but I couldn’t get the Finder to reload using that code, and it took too long to quit, so I used the following:

defaults write com.apple.finder AppleShowAllFiles TRUE
killall -9 “Finder”
/System/Library/CoreServices/Finder.app/Contents/MacOS/Finder

Note that killall will Force Quit the Finder, so if you’re in the middle of copying a file for example, it will stop it.

what is “appdelete” ? :)

AppDelete is an uninstaller program. You can use it to delete software and all of its related files. http://reggie.ashworth.googlepages.com/appdelete

Perfect! Just what I was looking for. Thanks!

I had to do two things to get it to work for me on 10.5.7

First, don’t ignore the warning about copying and pasting. DO NOT DO IT. You need to type it in.

Second, I had to remove the semicolons from the end of the 2nd and 3rd lines.

Thanks for the tip!

I tried this, but hidden files don’t show up. The double quotes around finder in lines 2 and 3 are different on the leading and trailing end, as are the single quotes. I assumed the first single quote was the symbol on the upper left of the keyboard, and the trailing single quote was the standard single quote, the left of Return, and that both double quotes were double quotes (shift-quote button to left of Return). Tried it with and without the semicolons, as per suggestion of Shawn.
Thanks in advance for further hints..

works perfect on 10.4.11, but it’s also true, do not copy and paste, just type regular apostrophes. Thank you!

Sweet! Thanks so much!

Strange, I don’t have the “More” field anymore when I right click. I seem to remember it before but haven’t noticed it not being there.

cant save it as a plug-in only as worklfow format on my 10.6.1 lapy
but on my brothers i can save it as a plug in and it works his version of oxs is 10.5.8.
how do i save it as a plugin on 10.6.1?

The same with only one plugin that just toggles the hidden/unhidden state instead of two separate plugins:
http://artofgeek.com/2009/09/16/toggle-display-of-hidden-files-in-finder-with-keyboard-shortcut

I prefer using a shell script, partly because I’m usually already in Terminal

http://macmartine.com/blog/2009/11/shell-script-to-showhide-hidden-files-on-os-x.html

These instructions are incomplete. Which template do you choose when Automator opens?

Works great in 10.5! This is a real time saver so thanks a lot!

This helped sooooo much! Did exactly what I needed and you made it sooo simple!!!! Thank you!

Fantastic! Thanks for the great tip. I used it to delete files that was no longer needed (Openfire).

How do i save a plug-in in 10.6.1?

on 10.6.3 it works
You just have to drag an new Run Shell Script box over for each line rather than putting them all in one box. This is what I did in 10.6.3

Choose to create a Service.

Services receives selected [files and folders] in [Finder.app]

Drag and drop three Run Shell Script instances (boxes) over to the workflow space.

First box:

defaults write com.apple.finder AppleShowAllFiles -bool true

Second box:

osascript -e ‘tell application “Finder” to quit’;

Third box:

osascript -e ‘tell application “Finder” to activate’;

File save as “Show Hidden Files”

Change “true” to “false” in the first box, and save it again with the name Hide Hidden Files.

Now, when you right click on any file or folder you will see those two options in the dropdowlist.

Both files saves in User > Library > Services

Scocasso!’s method works great in snow

protip: remember to type in the commands yourself, otherwise the the apostrophes will get messed up if you copy and paste.

it wouldnt work for me til i typed in the commands manually

thanks!

Thank you so very much for this posting, it helped me in a jam!!!

Hey, where is the users thing?? i can’t delete the invisible file and it’s annoying!!!!!!!!!!!!!!!!!!!!!!!!!!!! please help me

for osx 10.6 just change a little bit :)

defaults write com.apple.finder AppleShowAllFiles TRUE
killall Finder

Worked like a charm. Thanks.

Andrea’s modification for OSX 10.6 works, just give it a second to close finder then it reopens just fine.

Thanks for posting this! Very helpful!