Is there an item in Software Update that you don’t want to install for some reason? Rather than uncheck it every time you search for updates, make it disappear. While you’re at it, see how to check out all the updates you’ve ever installed.
Software Update, as most people know, is the mechanism built into Mac OS X that delivers security patches and maintenance updates to Apple’s software. Every once in a while, if your Mac is set to automatically check for updates, it will pop up with a new goody for you to install. But what if that goody isn’t something you want or need? Maybe it causes a compatibility issue or breaks something… maybe you just can’t be bothered with it. Whatever your reason is, there is a simple way to ignore the update so it won’t display when you launch Software Update in the future.

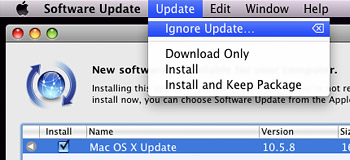
When Software Update is open, select the specific item you’d like to exile. Then go to Update > Ignore Update in the menu bar. Poof! It’s gone, just like it never existed. Plus, all future versions of that software will be hidden as well.

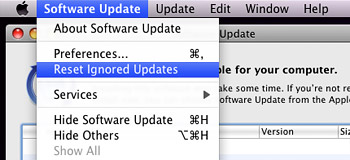
If you happen to change your mind, you can recover all of those long lost updates by going to Software Update > Reset Ignored Updates in the menu bar. The program will phone home to Apple’s servers and bring them all back for you to install.
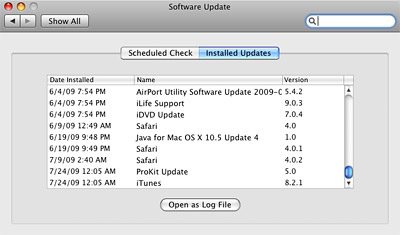
One last tidbit about Software Update I’d like to share for the sake of being complete has to do with updates you’ve already installed. If you go to System Preferences and click on the Software Update pane, there will be a tab called “Installed Updates.”

Here you will find an extensive list of all the updates you’ve ever loaded on your Mac, complete with date and software version number. This can be really handy if you’re troubleshooting a problem with your computer. For example, you’re on the phone with Apple tech support and they ask you if you made any hardware or software changes around the time the problem started. A quick look here and you can figure out if a recent update might have triggered the issue.


