Perhaps the most radical and obvious change in Mac OS X Snow Leopard is the totally revamped QuickTime X player. Taking what they learned from the iPhone’s media player, Apple has started with a clean slate on the Mac side.
Before we jump into what QuickTime X can do for us as users, it’s important to look at the program from the right perspective. Snow Leopard’s new version of QuickTime is almost like beta software. Apple decided to throw out everything that previously existed and start all over again. They did this because the code behind QuickTime 7 is old, inefficient, and not really geared towards the future of digital media. So while QuickTime X packs some promising new technology, it is a completely different project and many of the extras and pro features we’ve come to know are missing – for now. QuickTime X is about building a solid foundation for future development, and the next iteration will surely catch back up in the features department.
In the meantime, QuickTime 7 is still alive and well, and can peacefully co-exist with QuickTime X. Snow Leopard banishes it to the Applications/Utilities folder once the operating system has finished installing. If it’s not there, no problem. Just pop in that 10.6 disc, open the Optional Installs folder, and double-click the “Optional Installs.mpkg” file. The installer will give you the opportunity to re-install QuickTime 7 on your Mac (in the Applications/Utilities folder).
Now, let’s get to the good stuff. Even though QuickTime X is slimmed down, there are some interesting tidbits to share. A few of these tips also apply to prior versions of QuickTime or were previously only available in the $29.95 QuickTime Pro upgrade.

Toggling video dimensions
One of the areas where QuickTime X shines is resizing the viewing window. While making a video bigger or smaller as it was playing used to cause stutters, playback is nice and smooth in Snow Leopard. When you want to increase the size of a video in QuickTime X, a nice shortcut to remember is Command and plus (+). Decreasing the video size can be done, of course, by pressing Command and minus (-) at the same time. Even better, those with multi-touch MacBooks can take advantage of a cool trick. Using the two-finger zoom gesture launches full screen mode, and the two-finger pinch reverts back to the previous window size.
Playback control tips
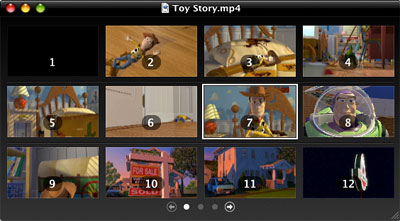
Playback controls that are overlaid on top of the video frame is a big change in QuickTime X. What’s interesting is the ability to click and drag the controls box anywhere within the window. I’m not sure of the practical use of this, but perhaps it will help ease the pain of obstructing the user’s view. Aside from the visual overhaul, playback controls function a little bit differently too. The rewind and fast-forward buttons work more like a DVD player now, going 2x, 4x, and 8x fast when pressed. Holding the buttons down does nothing, unlike in QuickTime 7. And for movie files that have chapters embedded in them, there is a great-looking chapter browser that can be accessed by pressing the button with 4 squares.

Recording sound, video, and your Mac’s screen
The most exciting part about QuickTime X for a lot of people is the inclusion of advanced recording features. The File menu is now home to items for New Movie/Audio/Screen Recording. This means you can record a high-quality video from your iSight camera, a voiceover with a microphone, or a screencast of your Mac’s desktop. A small arrow-like button on the window allows you to choose video & audio settings, and then it’s as easy as pressing Record.
Video trimming
Once you’ve got that video recorded (or you’ve opened a pre-existing video) in QuickTime X, you can trim it to chop off any parts you don’t like at the beginning or end. Just like on the iPhone 3GS, it’s incredibly simple and easy to figure out. It’s almost as if QuickTime X was built specifically for YouTube.


September 8th, 2009, 8:33 PM
Choise,
QuickTime X does not support MKV files or plugins like Perian at this time. It sounds like you still need QuickTime 7 for the time being. Instructions for reinstalling the older version are at the beginning of this post.